
Easy DIY: Paper Flowers & Painted Tacks
Hello everyone! How are you doing today? We have tons of sunshine and warmer temps so I’m feeling quite energized and ready to welcome in Spring. I thought today I would show a super easy project that I put together for you last month – I’ve been waiting to share it when it felt more appropriate for the season so now that March is here let’s think about Springtime decorating! This is a very quick and easy way to make paper flowers that you can tack all over your mood board or wall, or you can replace the thumb tack centers with a button or a badge or even a simple paper circle center in a complementary color and glue them to gifts instead of bows or you can make really large ones to put all over your walls for party decor. I’ve been excited lately about origami paper – no clue what brought that on – but I’m suddenly finding it gorgeous for the season so I’ve used sheets of it to make the flowers. Are you ready to see what I’ve come up with? I hope that you like it!
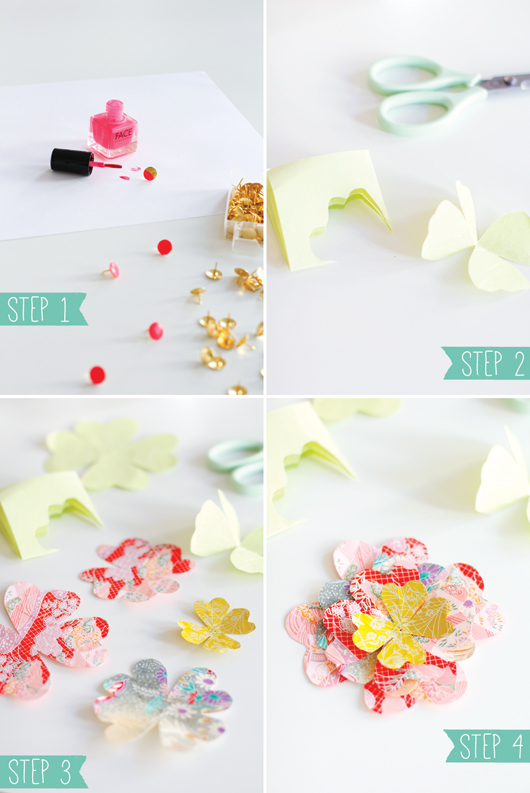
Step 1: Grab some metal tacks and paint the tops with 2-3 coats of your favorite nail polish color – let dry – I left mine out overnight.
Step 2: Fold origami paper (or paper that is perfectly square) in half, then half again so you have a small square. Cut into the square to create your flower using scissors. Petals do not need to be perfect, have fun and experiment. You can also free hand flowers if you like or you can cut out some cardboard templates in various sizes, trace around them, and cut out your flowers. This works if you want to create larger blooms as well.
Step 3: Cut into the paper to create different sizes of petals and mix different papers and patterns, too. I use 4-5 layers to create my flowers. You can even mix up texture – try incorporating newspaper (I love the look of Japanese and Chinese newspapers), crepe paper and tissue paper for some layers along with paper.
Step 4: Stack your petals to see how they look and rearrange or cut new ones as needed.
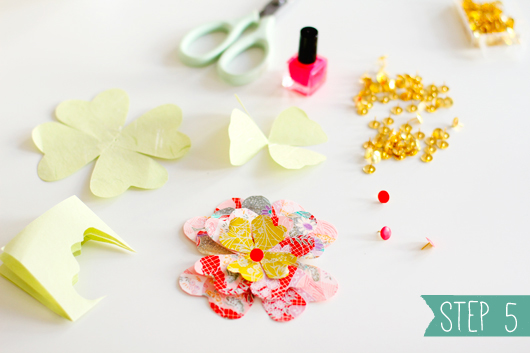
Step 5: Grab your thumb tack and stick it through the center! Now you can tack anywhere you’d like! You can also glue the petals in the center as you layer them and top it with a button or a circle you’ve cut using paper and add them to gifts, lamp shades or where you think you could add a little flower power in your home!
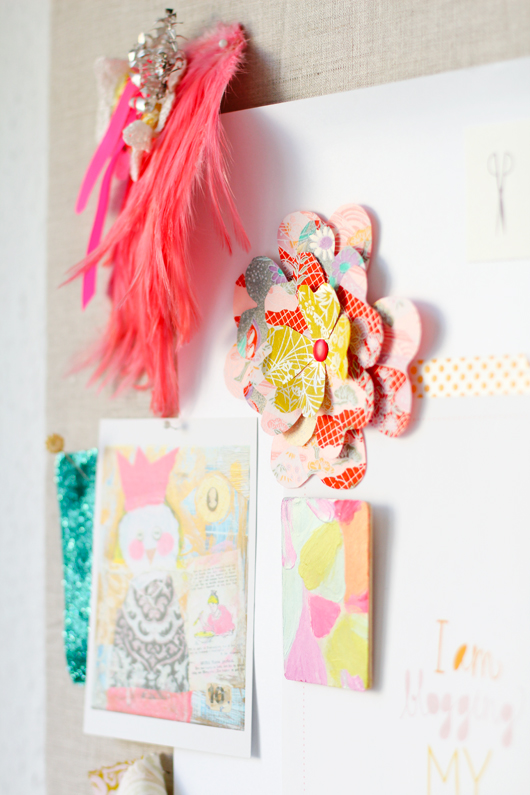
Easy and beautiful! I hope that you try making them and let me know how yours came out!
xo, Holly
(photos: holly becker/decor8)


March 5th, 2013 at 2:33pm
Oh, they’re gorgeous! I’ve been looking for how to make paper flowers myself as I wanted to make soft pink ones to bring the wall tree in my little girl’s room to blossom and a bit more girly: http://www.nordicroseblog.blogspot.co.uk/2013/02/a-girly-room-for-little-girl-with-both.html
I have some beautiful pink Farrow & Ball wallpaper samples, so I’ll get going. Thanks Holly!
March 5th, 2013 at 2:38pm
“Easy” & “Beautiful” are two of my favorite words when linked to “DIY.” Success!!! Those are lovely & absolutely make-able!!! I like the nail-polish on the tacks idea too, it must make a pretty durable, enamel-like finish. Thank you for sharing!
Heather B´s last [type] ..Wonderful Reads – Kate Spade New York Things We Love
March 5th, 2013 at 2:39pm
So beautiful!
March 5th, 2013 at 2:50pm
What a lovely blog post Holly about my very favourite topic…flowers!
I’ve printed it out so that I can make some when I’ve sourced some pretty paper :-).
Thank you so much for sharing…
Rona x
Rona´s last [type] ..Interview with Vanessa Collins of The Flower Mill Cornwall
March 5th, 2013 at 2:51pm
I’m going to try some of these for the corners of my bulletin board! I was just introduced to the wonders of painting thumb tacks with nail polish recently when I made these fun decorative push pins: http://plumfieldshop.blogspot.com/2013/02/fancy-thumb-tacks.html
I’m glad to have another idea to try the technique out with, as I already have plenty of tacks and nail polish :)
Lauren´s last [type] ..a promising start to the week
March 5th, 2013 at 3:03pm
Fun and fresh looking on this lovely sunny day. I’ll definitely share with my students. Thanks Cx
Clare Taylor´s last [type] ..Sally Falkner’s Creature Workshop
March 5th, 2013 at 3:07pm
These are so lovely and quite easy to make! I love the idea of using them to spruce up the bulletin boards in my home office!
March 5th, 2013 at 3:09pm
This is such a nice idea! I will make some flowers with my kids. They’ll love it!
Frau Sued´s last [type] ..Top of the Pops
March 5th, 2013 at 3:09pm
This is such a nice idea! I will make some flowers with my kids. They’ll love it!
Frau Sued´s last [type] ..Top of the Pops
March 5th, 2013 at 3:10pm
So much fun! I love the idea of sprucing up the bulletin boards in my home office with these. Thanks for sharing!
Jessica´s last [type] ..Weekend Wrap Up
March 5th, 2013 at 3:11pm
simple and gorgeous!
the perfect DIY.
Molly {Dreams in HD}´s last [type] ..Italian Royalty
March 5th, 2013 at 3:14pm
What beautiful flowers to brighten up your day!! I have to remember this DIY! =)
Chloe Moon´s last [type] ..Now She Knows…In The End, There Was Truth…A Relationship Post.
March 5th, 2013 at 3:16pm
I love it when you do these crafty-moment posts! They’re such a nice bit of personal Holly-pop that we can take over to our crafting desks. =)
Juliette´s last [type] ..Spring Sewing Discount
March 5th, 2013 at 3:17pm
These are so cute! I’m going to add that to my project list and decorate (decor8!) my bulletin board! Thanks for the terrific idea!
Thelma´s last [type] ..Baseball Printable Party Pack by ThelmaBs
March 5th, 2013 at 3:23pm
@Juliette thank you!!
March 5th, 2013 at 3:48pm
What a fresh and fun and easy project — thank you Holly for sharing this idea. I just bought some pretty papers so I’ll definitely be making some spring flowers.
Silky Hart´s last [type] ..Vision Board Workshop
March 5th, 2013 at 4:00pm
cute project….
janika R´s last [type] ..Hello Liberty..
March 5th, 2013 at 4:00pm
great tutorial! thank you!
tina´s last [type] ..kutija srce
March 5th, 2013 at 6:02pm
These are lovely, what a great idea. So effective too!
March 5th, 2013 at 6:16pm
So simple and so cute!
March 5th, 2013 at 11:07pm
So cute! Love this!
Olivia´s last [type] ..Green Design Taking it to work
March 6th, 2013 at 3:25am
Oh, i’m pinning this one! I love the idea of painting tacks with nail polish! what a cool tip:)
Rachel´s last [type] ..My Etsy Picks: Spring Fling
March 6th, 2013 at 4:07pm
Very nice! I did some very similar with hand made felt. Like brooches or for the hair, they looked very nice. Greetings from Argentinas!
March 6th, 2013 at 4:55pm
I totally agree, the Japanese paper for origami is a great source of inspiration. The floral patterns in particular. And you are right, create some paper flowers, it’s always a very nice way to celebrate the spring !
BohèmeCircus´s last [type] ..From Lily Moon
March 7th, 2013 at 11:17am
I’ll try this for sure, it seems to simple and beautiful !
Instead of metal tacks, I’ll use brass frasteners (is the word correct ? In French we call this “attache parisienne”…), in order to fix it on gifts or journal.
Thanks for the DIY Holly !
Mnêmosunê´s last [type] ..The lovely dozen – Paquet #5
March 7th, 2013 at 8:45pm
Why haven’t I thought of painting metal tacks before? Such an adorable and easy DIY! Thanks for the idea.
The flowers are so cute and the metal tack is the perfect touch.
Veronica´s last [type] ..Artwork that makes a BIG difference…
March 8th, 2013 at 8:42am
merci c’est le printemps qui revient!!!
ombre´s last [type] ..Nécessaire à couture brodé “petite fille”.
March 9th, 2013 at 5:54pm
Love your inspiration board & all the natural light shining in! Makes me happy during my sick day Saturday~
Cheers!
Rachel @CreativelyRedeemingHer´s last [type] ..Invitin’ YOU to my Spring Bash!!
March 10th, 2013 at 2:19am
So cute, love them!
Kris´s last [type] ..Flower Friday
March 10th, 2013 at 11:35am
beauriful and so pretty and lovely, well done. Love it!!!
March 11th, 2013 at 3:06pm
Darling! Will be perfect to use on the huge bulletin board that I’m creating for my daughters!
Kris {Driven by Décor}´s last [type] ..House Hunting Update
April 7th, 2013 at 5:02pm
Wow! Such a technique you share on your blog. Thanks a lot for sharing this idea. I’ll use this idea for my room wall decor.