Decorating Our Baby's Room: Part One
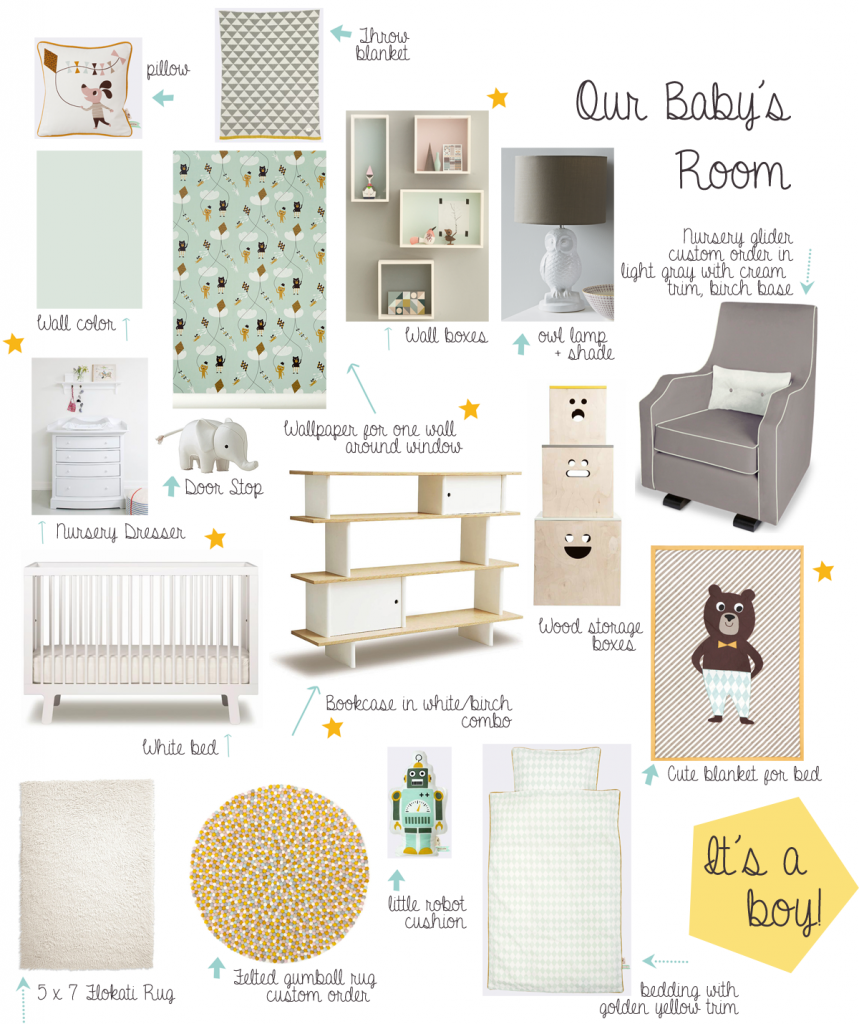
Hello everyone! I thought you may enjoy to see the mood board to our baby's room that I've been working off of for a few months now and to learn a little about the process of putting it all together. I didn't imagine a "blue" room and wasn't interested in mixing in pop culture references or anything too theme-y, so I kept it light, friendly, creative and happy and also in colors that work with the rest of our home. Here is my mood board and the 12 steps that I took to pull the look together.
 CLICK ON IMAGE TO SEE EVERYTHING CLEARLY AND TO READ MY COMMENTS
1. Inspiration + Mood. First, I selected a "jumping off point", a place to begin. For me, it was a patterned wallpaper. I had wanted wallpaper in the space since I first began thinking about a nursery so this was a natural starting point for me. I also started a private pinboard and a file on my desktop where I have been saving all of ideas from lighting to furnishings. 2. Measurements. Next, I measured the room. 3. Wallpaper + Colors. I decided if I wanted all walls patterned or just one. Decided on just one. Then I thought about the mood that I wanted to create. The color palette came naturally when I found the wallpaper that I loved. I pulled the palette directly from the pattern. Easy! 4. Paint. I picked a paint color for the other 3 walls to coordinate with the wallpaper, choose all white paint for the ceiling. 5. Flooring. The floor in the new apartment, at least in the back part of the house where the bedrooms are, was originally faux wood linoleum. It was a mess with tons of scratches. We decided on an Acorn hardwood floor with a matte finish and it is currently being installed. Yay! 6. Furnishings. I had nothing to put into the room, so I had to start from scratch so I chose the eco-baby bed first, then moved on from there. I'm still looking for a free-standing wooden closet. After the crib and storage, including wall boxes, a small bookcase and stackable wooden storage boxes for the floor with cut out faces, I thought about a comfortable rocker but I wanted something very well made, cozy and more of a glider but nothing that screamed out, "Baby Rocker!". That's not a bad thing, I simply want to be able to have my son use this chair in his room for many years. 7. Rugs. I choose two. A round felted rug that I've custom-ordered with hundreds of tiny balls to form a circular rug. The second will be a larger, rectangular (5x7) flokati rug because I love how soft and cozy they are and I know it will look great against the wood flooring. 8. Lighting. I ordered a sweet porcelain owl lamp and my friend gave me a darling hedgehog night light, so I'm now trying to find the perfect pendant for the room and a reading light for next to the chair... 9. Bedding. I started to buy bedding and finished the quilt I had begun making before I got pregnant for my "someday" baby. I've also been gifted with bedding so I'll work that into the room after everything is in place - so far, all of it works color-wise so it will be pretty. 10. Windows. Soon I'll have a custom roman shade made for the window. Thinking to do white with a yellow border so it looks very neat and I can bring out more of the golden yellow in the room. The yellow is the exact color of billy buttons (craspedia) so I'd like to work more of it into the room. Or I may go with a very nice patterned shade. Still thinking about that one... 11. Art. I'll pick out art for the walls, make my own artwork (I have a nice idea for this), create a bunting, and add a few more accessories to warm up the space. I would rather wait though until I have everything in place and then think about artwork, especially since I have some pieces in storage that may work that are also meaningful to me. 12. Accessories. With the basics in place, I've already begun to slowly buy a few accessories, children's books and of course, sweet tiny baby clothes. I would rather let this part grow organically since I know my friends and family will enjoy giving us sweet things. I'd rather have the accessories be very memory rich for us all vs. stuff I just loaded up on pre-birth from a store.
I'll soon show you before and during photos, link to all of the products that I end up using in the design, and then... the big AFTER reveal! I should have the part two post up by mid December and the "After" photos during the first week of January... So stay tuned!
What do you guys think???
