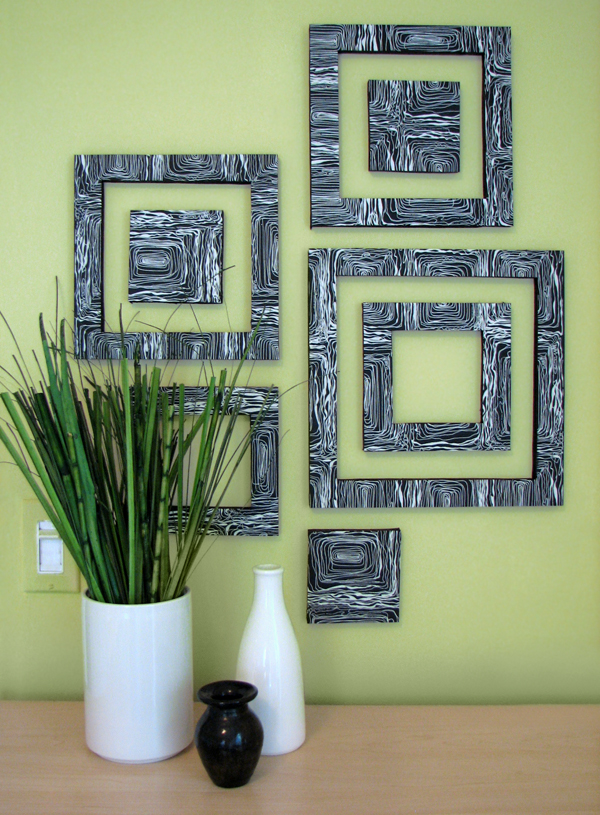
Greetings, decor8 readers! My name is Jessica Jones. I’m a professional graphic designer, and I write a blog called How About Orange which frequently features craft and DIY tutorials. I’m here today to share a project with you that you can customize to your liking using your favorite paper. Here’s an inexpensive way to add a geometric vibe to any wall?perfect for apartments or dorm rooms where nail holes are not allowed!
What you’ll need….
- 1/2-inch thick piece of foam board (available at art stores)
- Decorative paper
- Spray adhesive
- X-acto knife
- Ruler
- Pencil
- Acrylic paint
- Paintbrush
1. Spray your foam board with adhesive, making sure to hit all the corners and edges. Do this in a well-ventilated area on top of newspaper or protective plastic, not on your Chippendale dining room table. :) Position your decorative paper on the board and smooth it down. Be on the look out for air bubbles, you don’t want those!
2. Decide how big your largest square will be and mark the corners with pencil dots. Position your ruler along the line you want to cut and slide your X-acto knife along it, cutting through the foam.
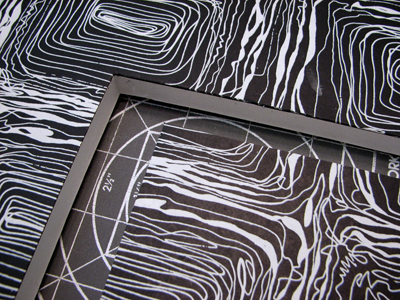
3. When your largest square is cut out, decide how wide you want your concentric “frames” to be. (Mine are 1.25″ wide.) Mark off the next set of corners inside your cut-out square, and trim out the next piece. Cutting tips: Start with a brand new blade. Make a few practice cuts until you get the hang of it. Don’t try to cut all the way through in one cut; use two or three. To avoid cutting past the point you want to stop, poke your knife in to make a short cut there first, then start cutting at the opposite end. If your cuts near the corners don’t quite go all the way through, flip the board over and finish cutting them from the back. And please don’t cut your fingers off. Holly doesn’t want to get emails about your ER visit.
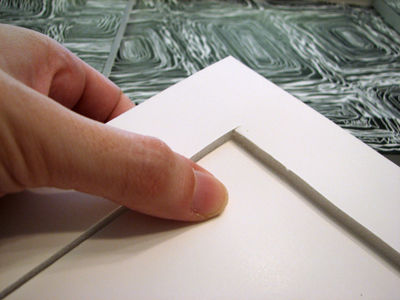
4. When your lines are cut through, pop the piece out by pushing from the back.
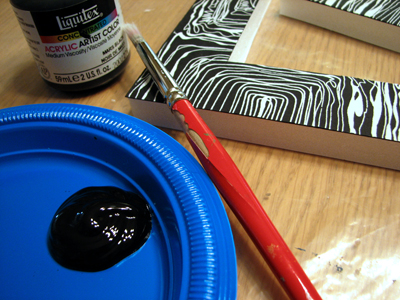
5. When all of your pieces are cut out, paint the sides with acrylic paint to match your paper. Let dry.
6. Attach the squares to your wall in a pleasing arrangement with wall putty or poster tape. I used blue painter’s tape and it worked like a charm.
That’s it! Of course if squares aren’t your thing you can create any shape of your liking. Get creative and most of all have fun! If you try this project at home and would like to show off the results, contact Holly and make sure to send her an image of your work on the wall. She’ll round up a few and share them on decor8 when she is back.
Thanks for having me today!
(images from jessica jones)


August 27th, 2008 at 1:32 pm
I love this, and since we live in an apt. this would be such a quick and easy way to add some decor. I will definitely give it a try somewhere in our apt. THANKS!!
erickas last blog post: Pear & Pie {oh so pretty}
August 27th, 2008 at 3:02 pm
Hi there, it’s really neat that Holly has all of the guest bloggers to fill in the posts whiles she’s away and your all doing a great job I must add. I love this project posted about today, it’s a great and simple ideal to add some texture to a wall when your not quite ready or able to fill it up with your favourite art pieces. Pop into my blog and add your name to my ‘giveaway’ draw in celebration of my 100th post. Thanks Holly and guest bloggers for the continual inspiration.
Mandy Saile of Bijou’s Whimsys last blog post: My 100th Post
August 27th, 2008 at 4:44 pm
A note to anyone who might try this project: if you’re planning to cut out shapes with curves, you’ll probably want to use thinner foam board. The thick 1/2-inch board will be difficult to cut and works best with straight lines.
Holly, thanks for the opportunity to send a project your way!
Jessica Joness last blog post: The Poster List
August 27th, 2008 at 4:44 pm
I love this idea! I have a bunch of fabric that was going to be turned into wall-art and this is a great option to stretched or framed squares. Will be trying it asap!
Pipers last blog post: {Burberry, Blumarine, Chloe, Zac Posen…}
August 27th, 2008 at 6:13 pm
very cool!
August 27th, 2008 at 9:54 pm
Love this idea! Great choice of paper! There are so many options in scrapbooking paper to use with this. TFS
August 28th, 2008 at 12:15 am
What a great looking project, for such little time and effort. Thanks Jessica!
Janets last blog post:
August 28th, 2008 at 9:09 am
[...] Over at decor8, guestblogger Jessica Jones from How About Orange has a great, relatively afforable and doable wall decor tutorial. [...]
August 28th, 2008 at 11:58 am
So great to see you here, Jessica! You are seriously one of the most creative people in the blogosphere ;) Love this idea and how it turned out in your photos – I think this be my new project for fall – thanks! :)
August 28th, 2008 at 12:41 pm
Another fantastic tutorial, Jessica! Thank you so much…I think I know what I might be doing with that big empty wall in my bedroom!
Jens last blog post: La Lutte Continue
August 28th, 2008 at 1:10 pm
wow why dident i think of that ive been making wall art with cardboard and yarn the tut will be up in about an hour if your intrested, I think im going to try this with cardboard too soooo cool and cheep!
I love making things from stuff I have so this should be fun I think ill make art for the kids room im gonna have to go buy some fany paper to match my living room then ill plaster my living room in these! Cant wait to try tons of shapes and sizes and fit them together! yay thanks
corris last blog post:
August 28th, 2008 at 1:18 pm
I love this project, but one word of caution: the putty can leave greasy-looking stains, and any tape can potentially pull paint off the walls. So, if you really need to be conscientious about your walls, be very careful about the adhesive you use!
fabframess last blog post: Presidents Playing Poker
August 28th, 2008 at 4:12 pm
Fantastic idea!!!
Neviss last blog post: What your Music says about you!
August 28th, 2008 at 8:00 pm
I love this tutorial! There are so many options for this- shapes and papers- even fabric!
Bettys last blog post: What August brings
August 29th, 2008 at 1:31 am
Wow, that’s so eye catching!
Becs last blog post: Diaper Cover
August 29th, 2008 at 1:53 am
[...] Jessica’s wall art.? Jessica from How About Orange was a guest blogger at decor8 this week.? Wall art, easy as pie to make, geometric. [...]
September 2nd, 2008 at 1:24 am
Well, Madame How About Orange said you’d want to see photos of our versions, and I just posted mine on my blog– http://kelculator.blogspot.com . They turned out pretty well, considering that my supplies weren’t ideal! Only took a couple of hours to make enough for two clusters (I did it while watching a movie) and they’re cheerful. And the dorm walls don’t mind.
Thanks for the tutorial!
Kels last blog post: Crafty Kel
September 7th, 2008 at 6:50 pm
Great idea!
For hanging, one could try those 3m tab adhesives… the tiny ones. If you remove them really slllooooowwwly they don’t generally pull off paint (but they do if you rush!).
December 11th, 2008 at 4:05 pm
You guys shoud check out the fruit crate label art at this site: http://www.VirtualBargains.com. They have vintage fruite crate labels…I was wondering if you guys thought those might look good as a variation of patterned wall squares? It might look to busy, but I think they have a great vintage look to them. Let me know what you all think!
December 19th, 2008 at 5:35 pm
This idea is fantastic! You can take it one step further. Apply some of that vinyl lettering to the wall and then hang the frame around the lettering. What a great dimensional idea! I get all of my lettering from mywalldecals.com. They are great to work with there. Can’t wait to try this project this weekend.
February 9th, 2010 at 11:34 pm
I don’t know if you will get this as it has been a long time since you have posted this or anyone has commented. But I would love to know if you remember where you found this paper and also how big these are. The standard 12×12 scrapbook paper looks like it will be somewhat small for this project. If you remember where you got it please let me know… I love this pattern and can’t find a different one that will do
February 10th, 2010 at 1:30 am
Hi Lindsey! You may want to contact the person who wrote this post, her name is Jessica Jones, this is her blog: http://www.jessicajonesdesign.com